
Glock Slide Modifications: Replacement
Let’s talk about replacing your stock Glock slide. This is one of the most costly modifications you can make, but there are a variety of possible benefits, many of which are not well understood by those who scoff at Glock slide work such as slide replacement:
- Improved serration locations and patterns to help with slide manipulation
- A machined mounting surface for the addition of a red dot sight
- Weight and recoil reduction
- Tighter tolerances to improve accuracy, especially when paired with a replacement barrel
- Caliber change (when paired with the appropriate barrel)
Now then, you must decide if you are reusing your internal parts from your old slide (if you have one) or purchasing new internals for your Glock slide modification. There is nothing wrong with using the parts from your old slide, but if you choose to do so, be sure to purchase a new channel liner. Channel liners are a one-time use part so removing your old one and re-using it is not feasible.
If you are thinking about purchasing new internal parts, check out our Slide Completion Kit.
If you will be re-using your old internals, we’ll first go through the disassembly of your old slide.
Step 1.Use a Glock modification tool, or other rigid rod about 1/8th inch in diameter, to press the back of the spacer sleeve toward the muzzle and hold it in place. (see figure 1) It is accessible from underneath the slide. This unlocks the back cover plate, allowing you slide it out of the back of the slide with your thumb. (see figure 2) Sometimes, the firing pin or plunger assembly will want to jump out of the slide, so be careful.
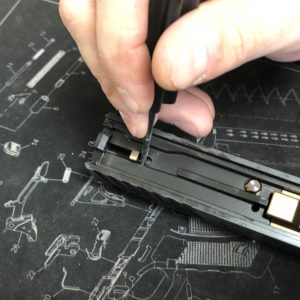 figure 1

Step 2.With the cover plate removed, gently release the tension on the spacer sleeve. Grab the back of the spacer sleeve and remove the firing pin assembly from the slide. (see figure 3)

Step 3.As you look into the firing pin channel from the rear of the slide, you’ll notice a small spring and plastic bearing protruding from a hole to the right of the firing pin channel. Pull on this spring and you should remove the extractor depressor plunger assembly as one piece. (see figure 4) That assembly will include the plastic bearing on the back, the spring, and the metal shaft of the plunger itself. If the plunger stays in the slide, turn it upside down and give it a shake until the plunger comes out.

Step 4.To remove the extractor, you must first compress the firing pin safety from the underside of the slide. Push it in with your finger and hold. This unlocks the extractor which can then be lifted up and out of its notch. (see figure 5) Sometimes a few shakes or taps on the palm of your hand will free it up. The firing pin safety and spring will then come out of the slide from underneath. (see figure 6)


Step 5.The Glock slide likely still contains the channel liner in the firing pin hole (in rare cases, the channel liner will come out with the firing in assembly in step 2 above.) Ensure you have a new one if you are installing these parts in your new slide.
Time to assemble the new handgun slide:
Step 1.Insert the new channel liner into the slide. The leading edge of the channel liner will have a small bevel on it. This side goes in first. Be sure to use a Channel Liner Tool; we’ve seen people do damage to their parts without one—it’s worth the ten bucks. (see figure 7)

Step 2.Insert the firing pin safety and spring into the safety hole from underneath the slide. Make sure the spring does not turn sideways or fall out during installation. (see figure 8) Hold the assembly down and insert the extractor from the side. Release the firing pin safety and the extractor should hold it in place. (see figure 9)


Step 3.Insert your firing pin assembly into the slide
- If you have purchased a completion kit and need to put together the firing pin assembly:
- Place the spacer sleeve over the firing pin, ensuring the back of the firing pin slides into the notch in the spacer sleeve (see figure 10)
- Place the firing pin spring over the firing pin (see figure 11)
- Compress the spring with your fingers and place each spring cup over the shaft of the firing pin such that when the spring is released, the spring cups hold the spring in place (smaller side of the spring cups toward the spring). (see figure 12)


Step 4.Insert the extractor depressor plunger assembly into the smaller hole in the back of the slide.
- If you have purchased a completion kit and need to put together the plunger assembly:
- Press the spring loaded bearing into the depressor plunger spring. Ensure it seats flat against the top coil of the spring. It can be a bit of a challenge, but it is doable by pushing hard against a flat surface. (see figure 13)
- Press the other end of the spring over the extractor depressor plunger. It should clip into place (see figure 14)


Step 5.Using the Glock tool, or other rigid tool mentioned above, press the spacer sleeve toward the muzzle from the underside of the slide and hold it. (see figure 15)

Step 6.Slide the cover plate over the firing pin assembly until it is retained in place temporarily. Release pressure on the spacer sleeve. The back of the spring loaded bearing will still be poking out. (see figure 16)

Step 7.Use your tool to push the back of the spring loaded bearing into the slide and push the cover plate to its fully upward position. It should click in place and be retained. (see figure 17)
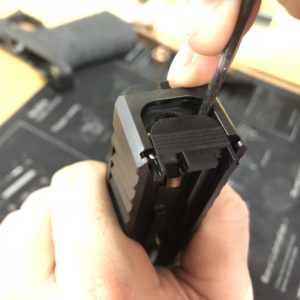 figure 17
Dry fire your pistol to check for proper function. We recommend, following slide replacement, at least 200 rounds at the range before deeming any pistol ready for defensive use.
We realize it’s easy to get stuck when doing this the first time. Give us a call! We’re happy to walk you through any issues! 469.458.6808
If you’re ready to replace your stock Glock slide, check out our custom pistol slides here!